There’s no way around it: Amazon and Google own product discovery online. According to the latest Future Shopper report, 36% of all product searches start on one of those two platforms. The bulk of product discovery often takes place on Amazon, where commoditization and lack of data sharing undercuts a brand’s ability to establish direct and long-term connections to customers.
The next likeliest place for customers to find products is with search, which makes up 30% of product discovery. And a critical portion for retailers is Google Shopping, the leading price comparison portal that drives over 76% of retail search ad spend. This means that merchants who underutilize the search engine’s advertising offering could be missing out on a huge chunk of revenue.
If you’re a retailer who’s hungry for Google strategies that lead you to actual growth, you’ve come to the right place. This guide to Google Shopping covers:
What is Google Shopping?
Google Shopping is an advertising platform that allows businesses to reach people searching for similar products in its search engine.
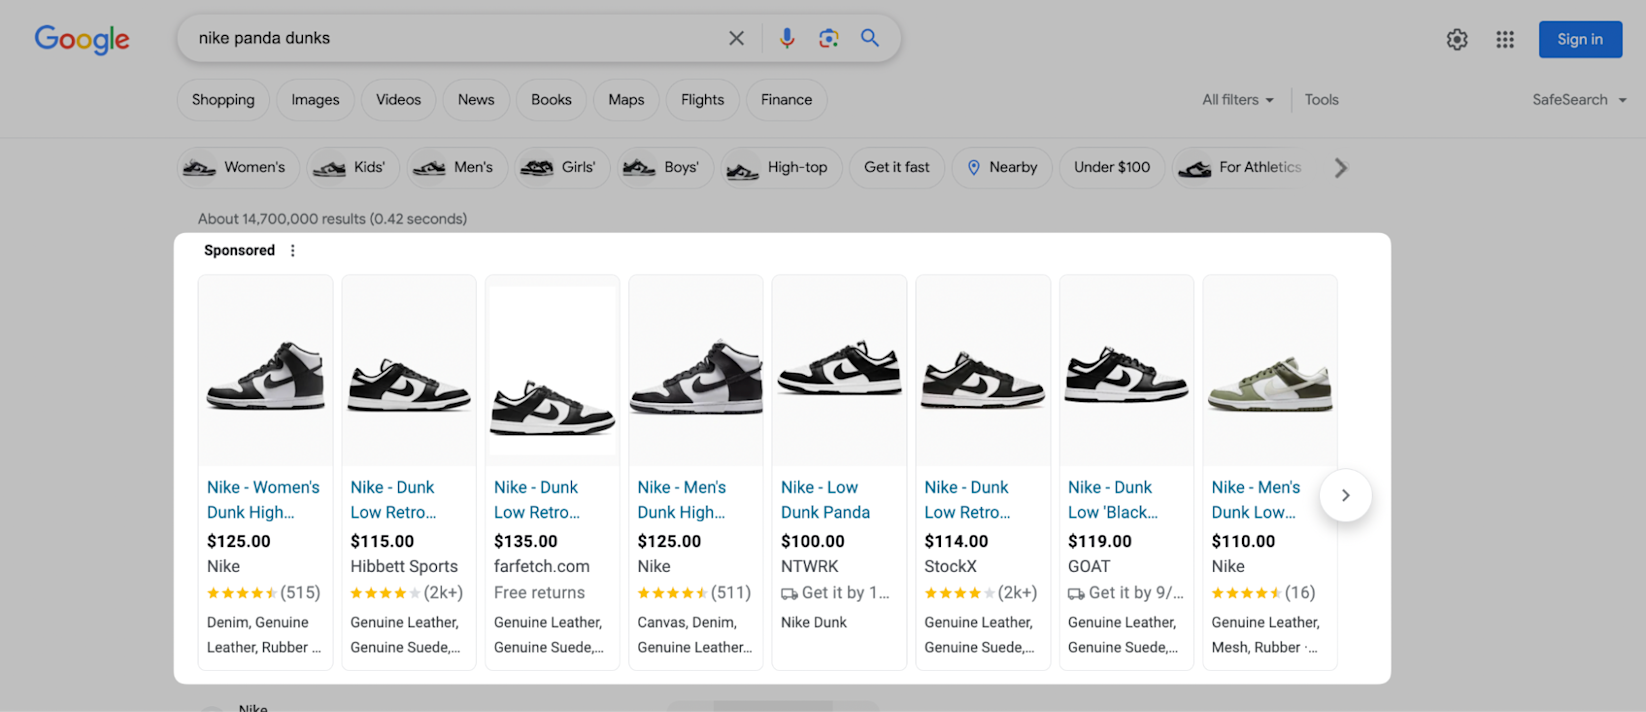
Users can use Google Shopping to browse items from several different online retailers and view an item’s price, availability, and fulfillment options. When they click a product listing, the Shopping tab takes them to the relevant product page on the retailer’s ecommerce site.
![Google Shopping results for “Nike panda dunks”.]() Google Shopping tab appears before organic listings for this search term.
Google Shopping tab appears before organic listings for this search term.
How does Google Shopping work?
Google Shopping works by collating product listings from retailers that participate in Shopping campaigns. This database is analyzed to understand what the product is and who would buy it. When an ideal shopper conducts a Google Search for the product, the platform’s algorithm matches the query with the most relevant product listings in its advertising database. The advertiser is then billed depending on the bidding strategy they’ve selected.
How to create your Google product feed
If you don’t have one yet, create a Google Merchant Center account. This is the place to add your product feed and connect your product data to Google Ads (formerly known as Google AdWords) so that you can start building shopping campaigns. Here, you’ll also configure your basic business information, shipping, and tax settings.
Once your merchant account is set up, start working on the product feed. Your Google Shopping product data feed is a file that contains product information like its titles, prices, product images, and other details that tell Google what your products are and how ads for them should be served.
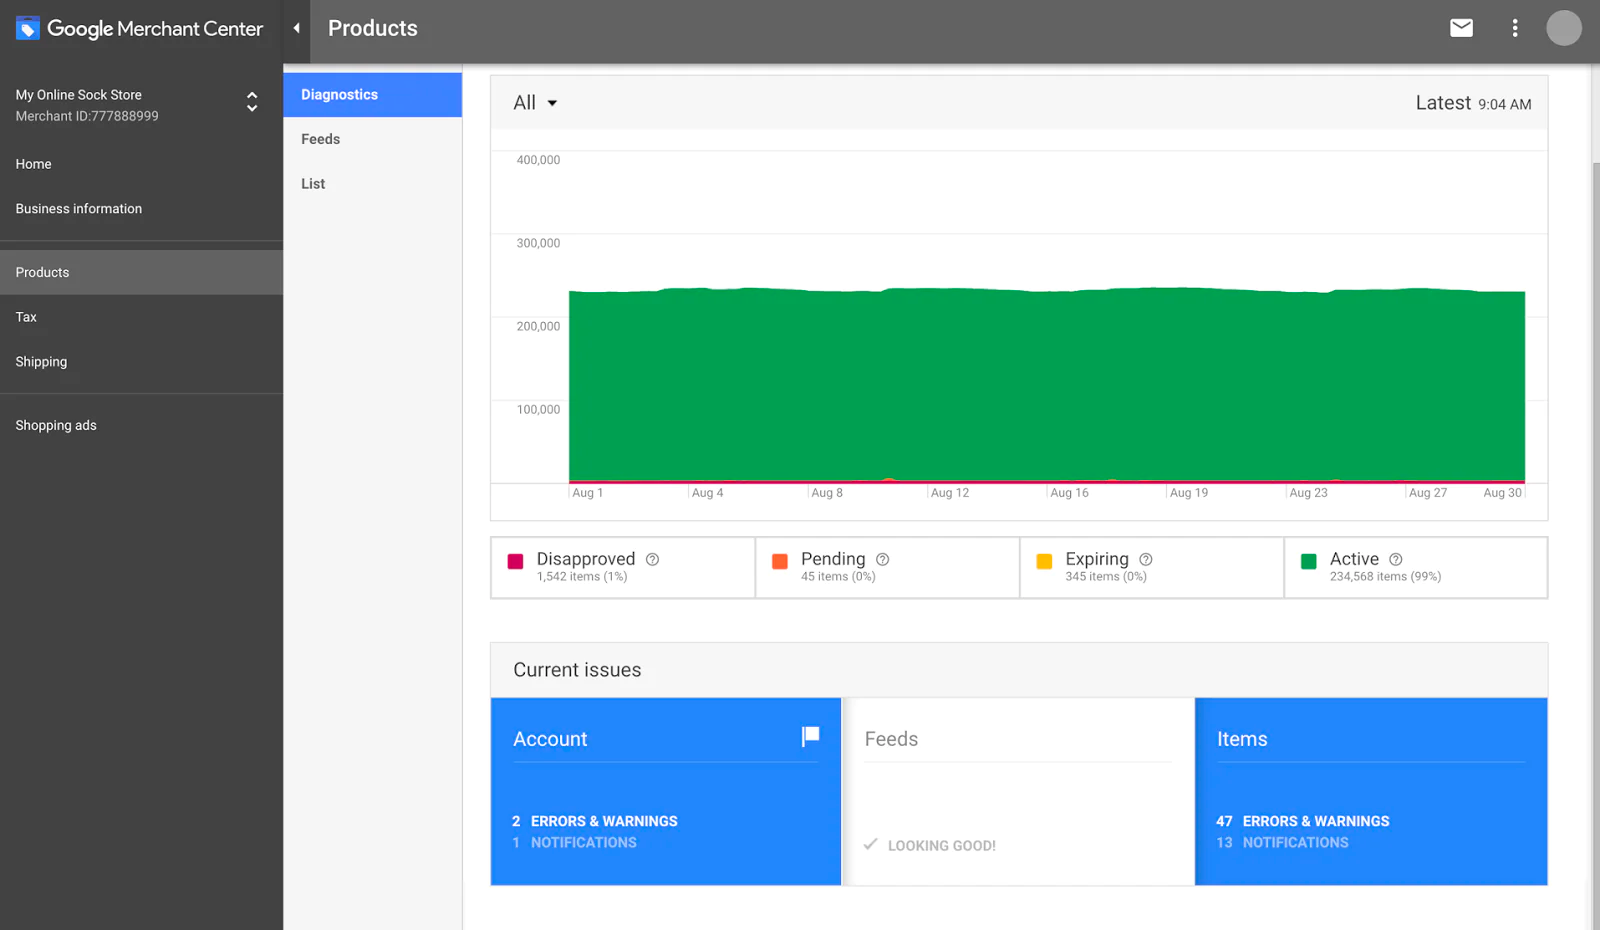
![Screenshot showing active, expiring, pending, and disapproved products in Google Merchant Center.]() Google Merchant Center shows product inventory.
Google Merchant Center shows product inventory.
Unless you only sell one or two products, this isn’t the kind of file you want to create manually. With a product base of any scale, creating a product feed manually is likely to lead to small errors, inaccuracy, and overall incompleteness.
If you’re not using a shopping platform like Shopify that supports Google Shopping, generate an XML or CSV file with all of your product data. If you need help with identifying the required and recommended attributes, you can generate a feed using a Google Sheet within the Merchant Center.
Since Google requires that your product feed be refreshed every 30 days, a Google Sheet or static CSV file isn’t the most efficient way to maintain an up-to-date catalog for Google campaigns.
The Merchant Center does allow you to schedule automatic uploads with a Google Sheet, so you may be able to get by on a Google Sheet for a while if you have a small catalog (fewer than 15 to 20 products) and your inventory rarely changes.
In any other scenario, however, you’ll want to make sure you have a system in place that automatically uploads your feed at least daily, so that your ads are always showing the most important and in-stock products.
How to optimize product titles for Google Shopping campaigns
Unlike paid search campaigns, Google Shopping doesn’t let you target specific keywords to control the intent of your traffic and how you bid on it. The searches that trigger your ad are totally dependent on your product feed.
“We hardly ever use the product titles that are on our website,” says Jeff Moriarty, owner of Moriarty’s Gem Art. “We optimize them through Google Shopping based on the keywords people search for through our Google Shopping account. Doing this has helped us increase exposure, clicks, and sales by over 300%.”
Using search keywords doesn’t mean you have to scrap your product descriptions—but for the sake of getting more and better traffic, now you know where to set your priorities.
Put keywords first
When optimizing product titles for your Google Shopping campaigns, it’s not just about the words in your product title: it’s also about how you order them. Google reads your product titles from left to right—so words earlier in the title may be given more weight when Google determines when to serve an ad.
With this in mind:
- Move the most important parts of your product title closest to the front.
- Include the name of your product in the title. (It’s easy to take that one for granted, but it matters to searchers and to Google.)
- If you’re selling a device or appliance, include the SKU or model number in the title.
- Use your brand name appropriately. If people search for your brand specifically, include it toward the front. Otherwise, include it at the end.
“While simply cramming keywords into your titles can come across as inauthentic, putting none in at all just leaves clicks on the table,” says Karl Sandor, co-founder and CEO of The Growth Guys. “At the end of the day, if Google only gives you two main variables to control shopping ads with, you have to make sure you put enough effort into each.”
Add descriptive terms in product titles
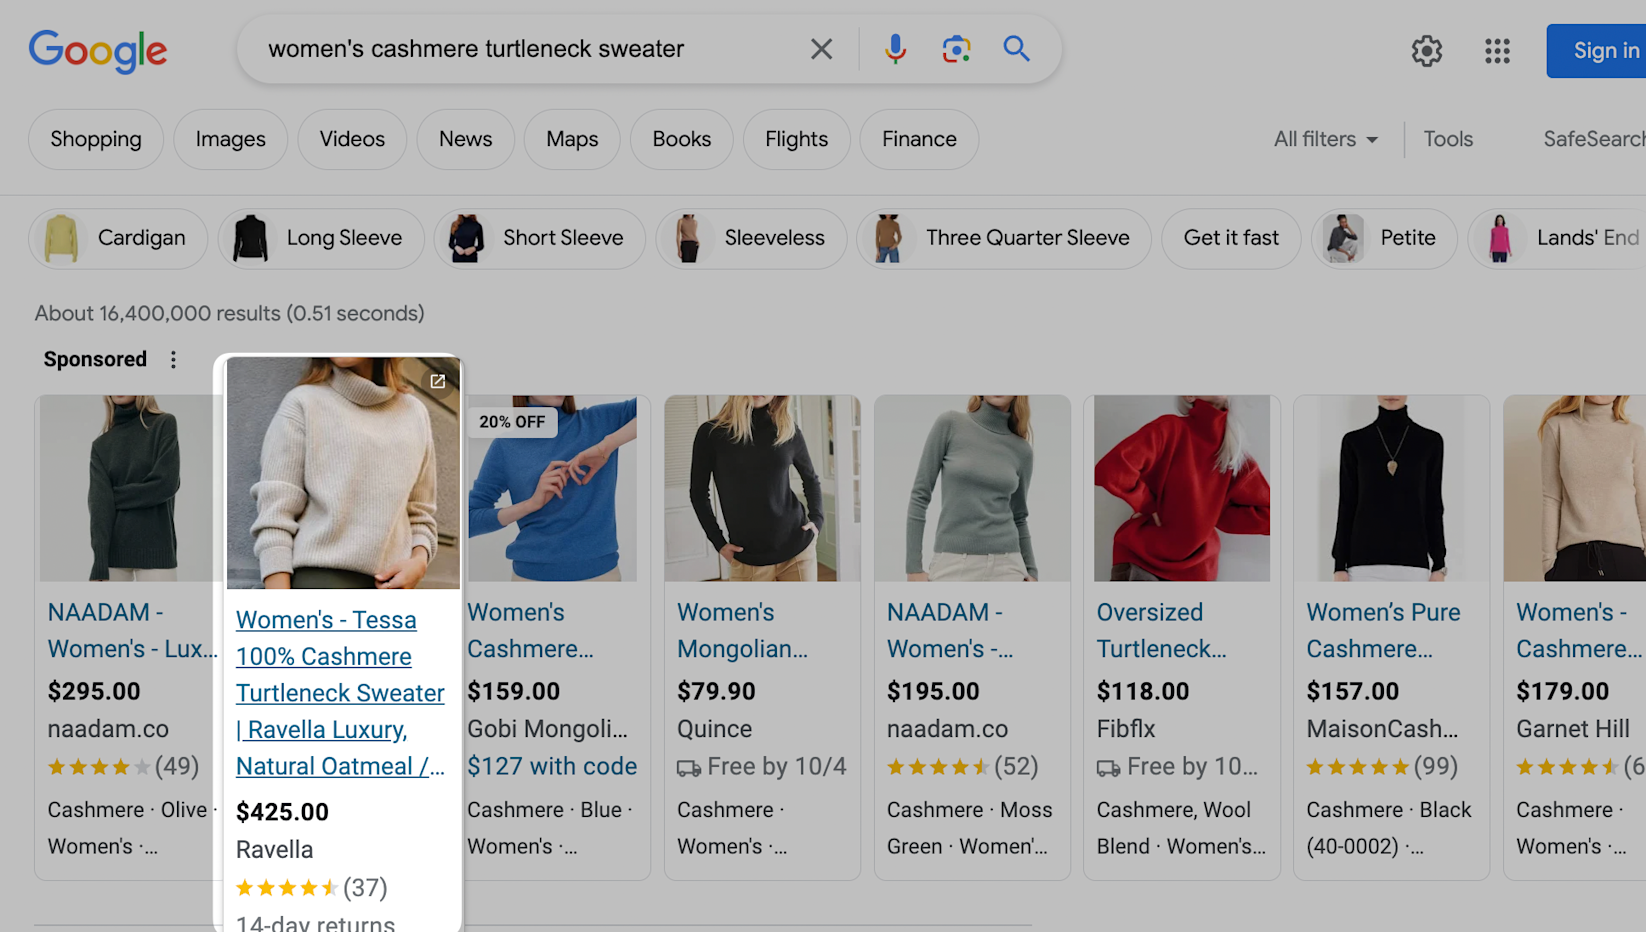
If I search for “women’s cashmere turtleneck sweater,” smart advertisers are going to mention those keywords in their title and then tell me a little more about the product.
Women’s clothing brand Ravella does a great job of this in its product title, hence why it appears among the first Google Shopping results: it names the gender and type of sweater right upfront, which happens to match how I search. The product listing also clearly states the name of the product, brand name, color, and size.
![Product listing with the title “Women’s - Tessa 100% Cashmere Turtleneck Sweater”]() Sometimes, retailers sync their product data to Google Merchant Center from their website and take no further steps in optimizing their product titles.
Sometimes, retailers sync their product data to Google Merchant Center from their website and take no further steps in optimizing their product titles.
If your business does the same thing, you may be thinking: “My developer doesn’t have time for more! We have a backlog that goes on for days, and it’s all work we need to keep the business running!” Thankfully, it’s now possible to make small changes to your product titles through the Google Merchant Center with feed rules (which we’ll cover later).
Mention your brand name in product titles
Searches containing your brand name tend to convert at a higher rate than generic searches. People using these queries are already familiar with your brand and its products—perhaps they’re even existing customers who want to find a specific product on your site to include in their next order.
That said, product titles appear the same to everyone in the Merchant Center, regardless of whether an individual shopper has already interacted with your brand.
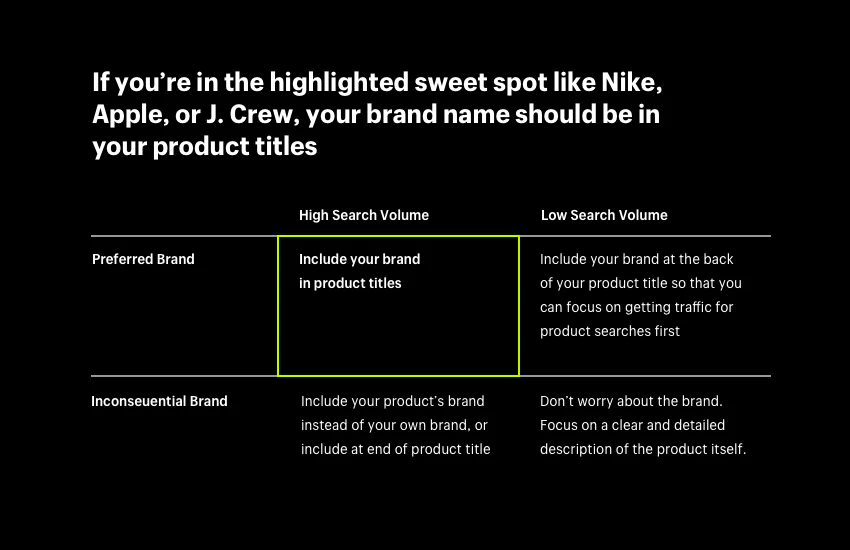
This begs the question: Should you use your brand in your product titles? And, if so, where? To help you answer that question, ask yourself:
- Does your brand name get enough search volume to trigger ads?
- Does your brand name make a difference in your sales?
Once you have your answers, you can use this table to break down how your brand name fits into your product title strategy.
![Table that shows how products from a preferred brand with a high search volume should include the brand name in product titles.]() Should your brand name be in product titles? Use this table.
Should your brand name be in product titles? Use this table.
Unless consumers typically search using your brand name to find the product they’re looking for, we’ll categorize it as an “inconsequential brand.” The most common case for an inconsequential brand would be third-party sellers, like department stores or other retailers.
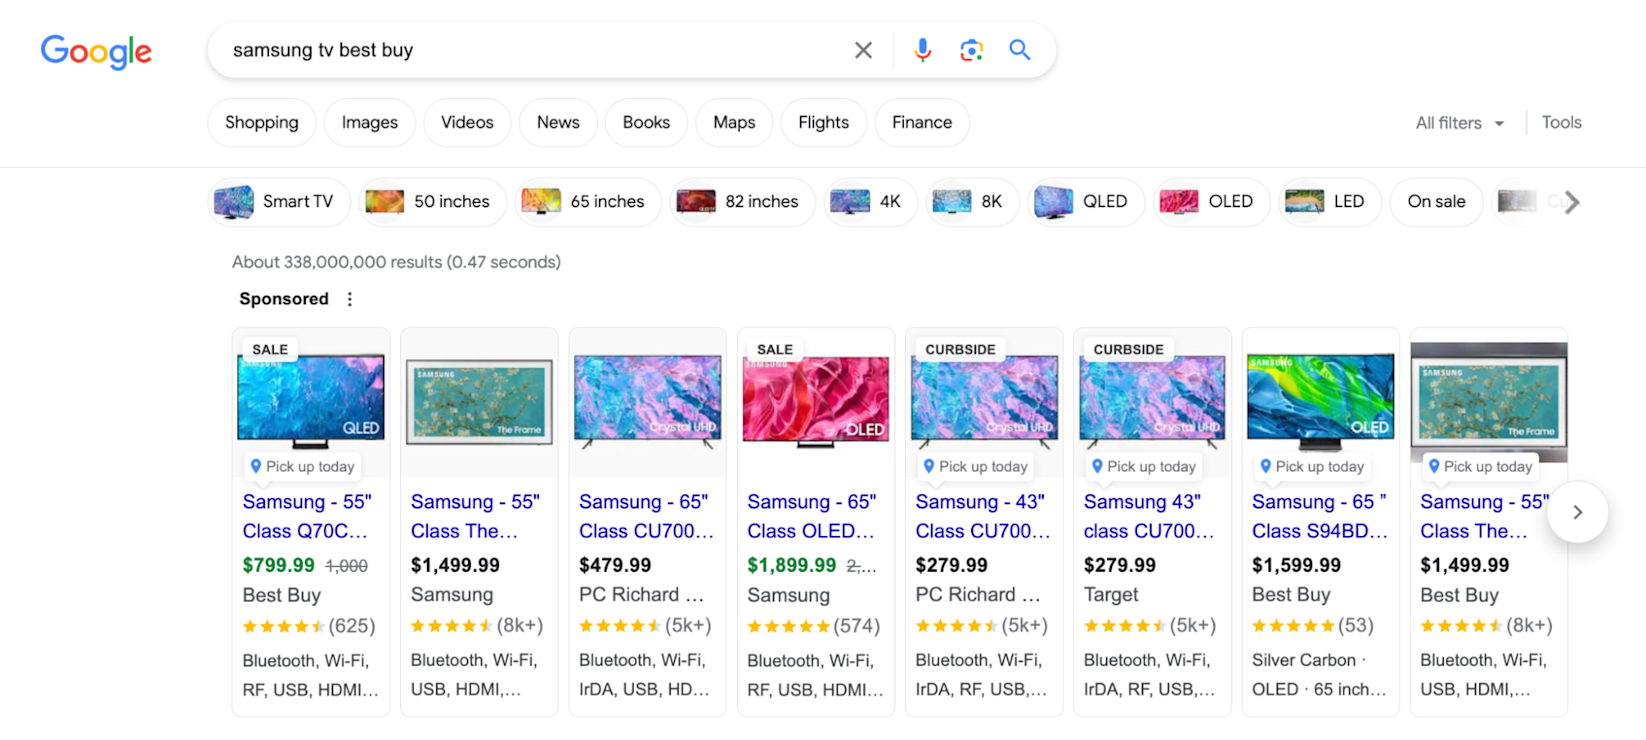
Best Buy, for example, sells electronics from multiple different brands. It focuses on including the individual product brands instead of “Best Buy” in its product titles:
![Google Shopping search results for “Samsung TV best buy”.]() Best Buy doesn’t include its brand name in Google Shopping titles.
Best Buy doesn’t include its brand name in Google Shopping titles.
If you’re running Google Shopping campaigns for a marketplace or reseller, take the same approach and use product brand names rather than your store’s brand name in your product titles. This gives you the best chances of maximizing your products’ visibility for people who both are and aren’t familiar with your ecommerce store.
What if you own your brand and your first customers love it, but not a ton of people know about it yet? In this scenario, don’t suppress any chances for your products to show for generic product searches by including your product name upfront. Instead, place it at the end of your listing.
How to structure Google Shopping campaigns
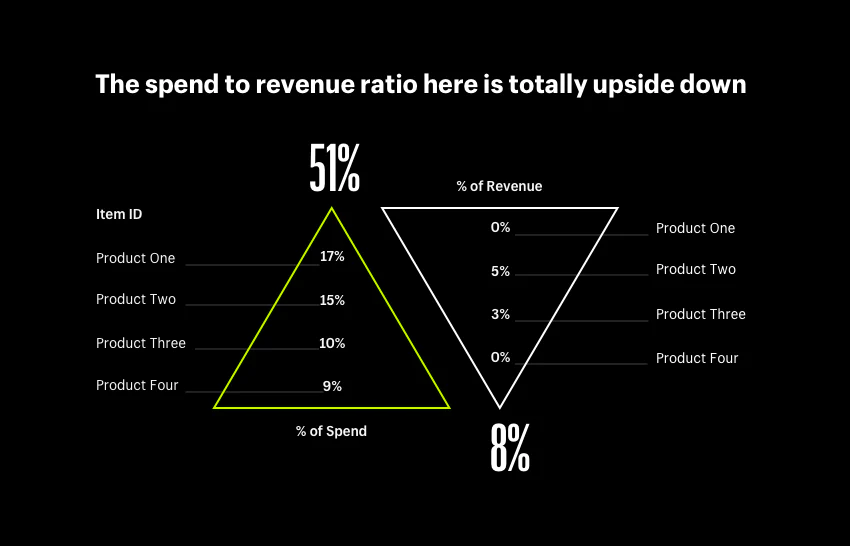
If you’re already running Google campaigns and feel confident in your product titles but can’t seem to win customers, you may be falling victim to “the mob effect.”
![Triangle diagram showing how the spend to revenue ratio is upside down.]() The mob effect in theory.
The mob effect in theory.
The mob effect happens when a few particularly searchable products steal the lion’s share of your budget and bring you little to no conversions in return. Because your budget’s being bogarted by those select products, your top sellers and customer favorites are hidden from browsing shoppers.
Let’s put some numbers to the story using the below example. These data points are from an actual account that was stuck under the mob effect.
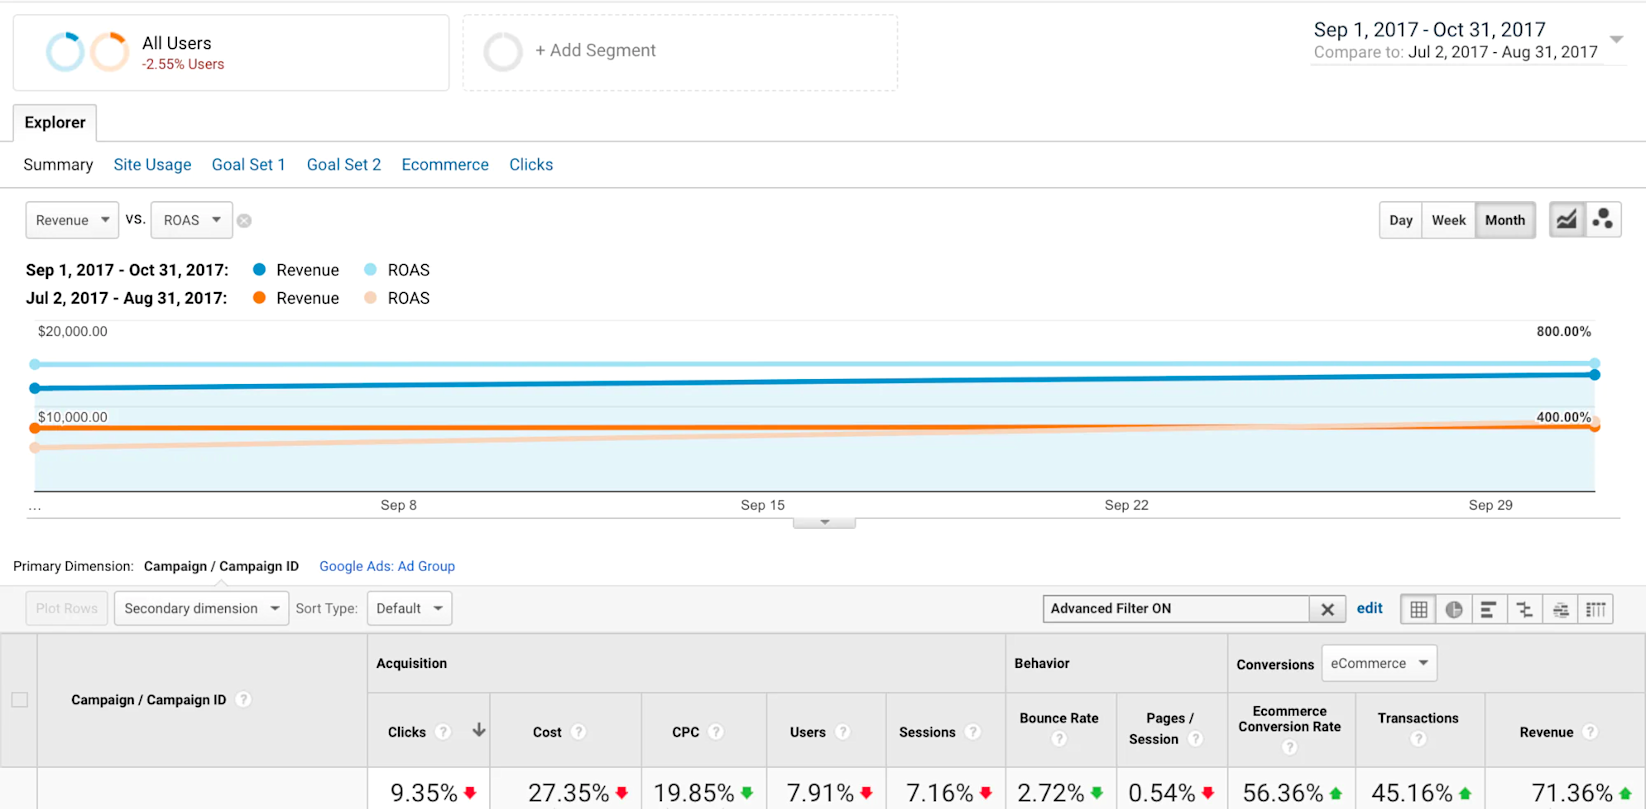
As you can see, four products are taking up over half of the budget while contributing less than a tenth of the revenue. Even if this account were already profitable, imagine how much more it could achieve with an adjustment—and it did. From one 60-day period to the next, spend decreased by 27%, while revenue increased 71%:
![Google Analytics report showing a 71.36% increase in revenue over two reporting periods.]() Google Analytics results for this case study.
Google Analytics results for this case study.
In the next sections, we’ll cover campaign-level and ad-group-level strategies to help take your campaigns to new heights. There are multiple ways to save your Google Shopping campaigns from the mob effect, after all.
Use negative keywords
While you can’t target online shoppers using keywords in your Google Shopping campaigns, you can fine-tune your strategy and increase the odds of appearing for specific searches by using negative keywords.
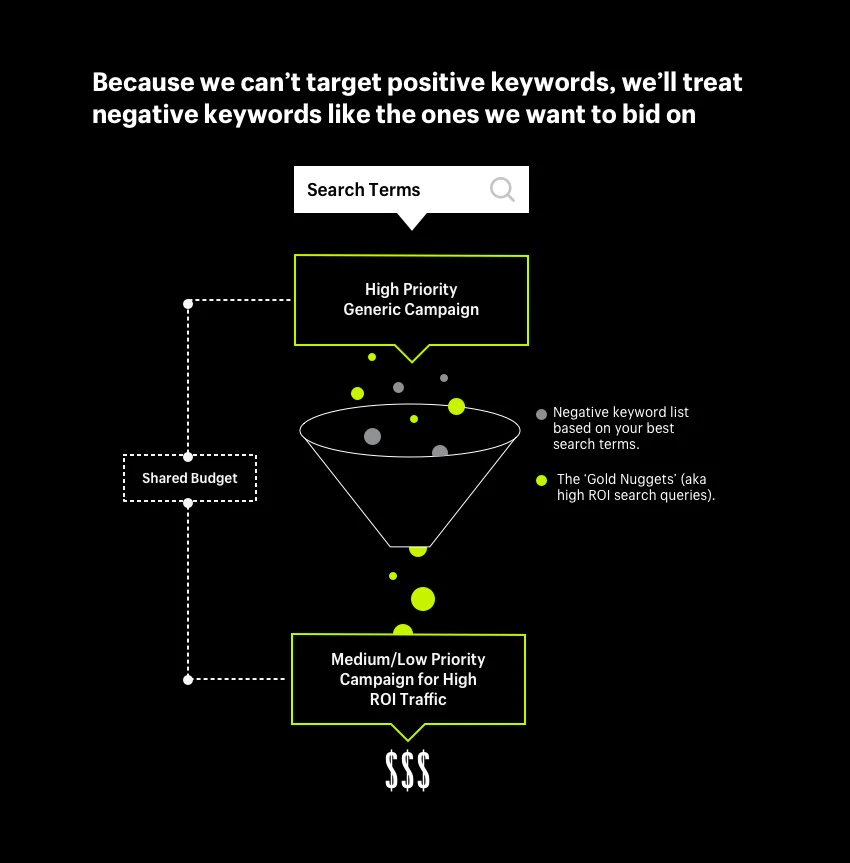
Performance marketing agency KlientBoost calls this “the gold pan technique.” It’s the process of mining the most profitable search terms captured by shopping campaigns and suppressing generic searches that convert less often.
![Illustration of negative keywords and high ROI search queries going into a funnel, but only high ROI keywords coming out.]() Separate negative keywords from your high priority campaign.
Separate negative keywords from your high priority campaign.
Because the product feed will always determine how your ads are served, you need to use negative keyword lists, Shopping campaign priorities, and shared budgets in order to funnel your traffic from a generic campaign to a specific campaign. This will help you to pay less for generic clicks and maximize traffic for the more profitable search terms.
Negative keywords force traffic for those search terms to a lower-priority shopping campaign that will target only your prized searches: the golden nuggets. As a bonus, you’re free to bid higher in your lower-priority campaign to maximize traffic for your top-converting terms.
For example, you could build:
- One set of gold pan campaigns for your top sellers
- One set of gold pan campaigns for all products
- One set of gold pan campaigns for products that are on sale, or a catchall campaign to help you keep up with frequent inventory changes
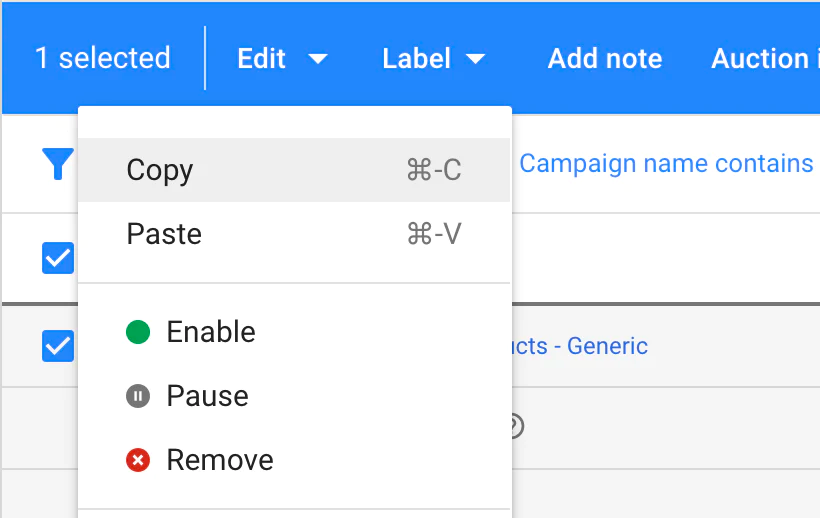
To use this Google Shopping structure, two of your shopping campaigns must have matching ad group structures and settings for your traffic to be funneled appropriately. A mismatch could result in a leaky gold pan (and leaked profits as a result).
![Screenshot of Google Shopping dashboard when copying a campaign.]() Create one Shopping campaign (or use an existing one) and duplicate it.
Create one Shopping campaign (or use an existing one) and duplicate it.
Now that you have built two Google Shopping campaigns, what profitable search terms should you add to the negative keyword list attached to your generic campaign? To start, you could use one of two common methods:
- Exclude brand terms from your Shopping campaign.
- Download a search query report with a sufficient amount of traffic, isolate the highest performing search queries, and add those as negatives to your generic campaign.
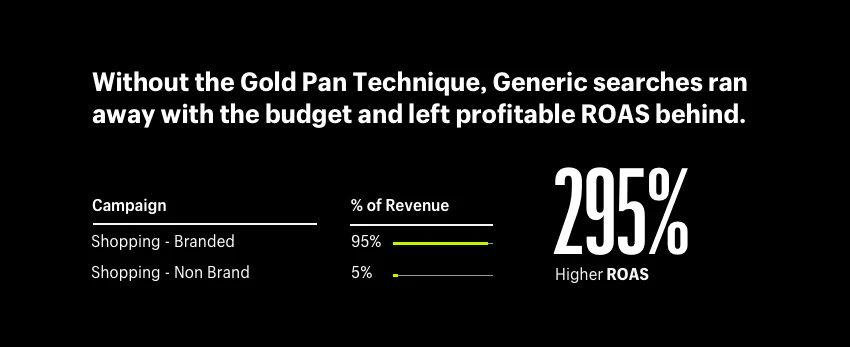
If your brand falls into the sweet spot of high-traffic volume and relevance, exclude your brand terms from your generic campaign. Klientboost reports that, after applying this method to a client who fell in the sweet spot, it saw a 295% higher return on ad spend, or ROAS, from the branded Shopping campaign:
![Results of two Shopping campaigns with branded search accounting for 95% of revenue.]() The Gold Pan technique gave a 295% higher ROAS.
The Gold Pan technique gave a 295% higher ROAS.
If your brand name falls outside of the sweet spot, use a report of historical top-performing searches and exclude those from your generic campaign.
The final piece that ties everything together is a shared budget. A shared budget ensures that your group of Shopping campaigns always remain in the same auctions and hold your gold pan together.
Unless you can somehow conjure every negative keyword in the universe immediately, the high ROI campaign will start to claim all the generic traffic and won’t be a high ROI campaign anymore. It’s so much easier to use your shared budget, negative keywords, and priorities appropriately.
Finally, if you’re showing ads for the same product in multiple campaigns, priorities tell Google which campaign you want to promote your product first. Priorities don’t affect your search relevance or the likelihood that your product will show for a certain query. In this case, priorities just help us assign the different pieces of your gold pan.
Create single-product ad groups
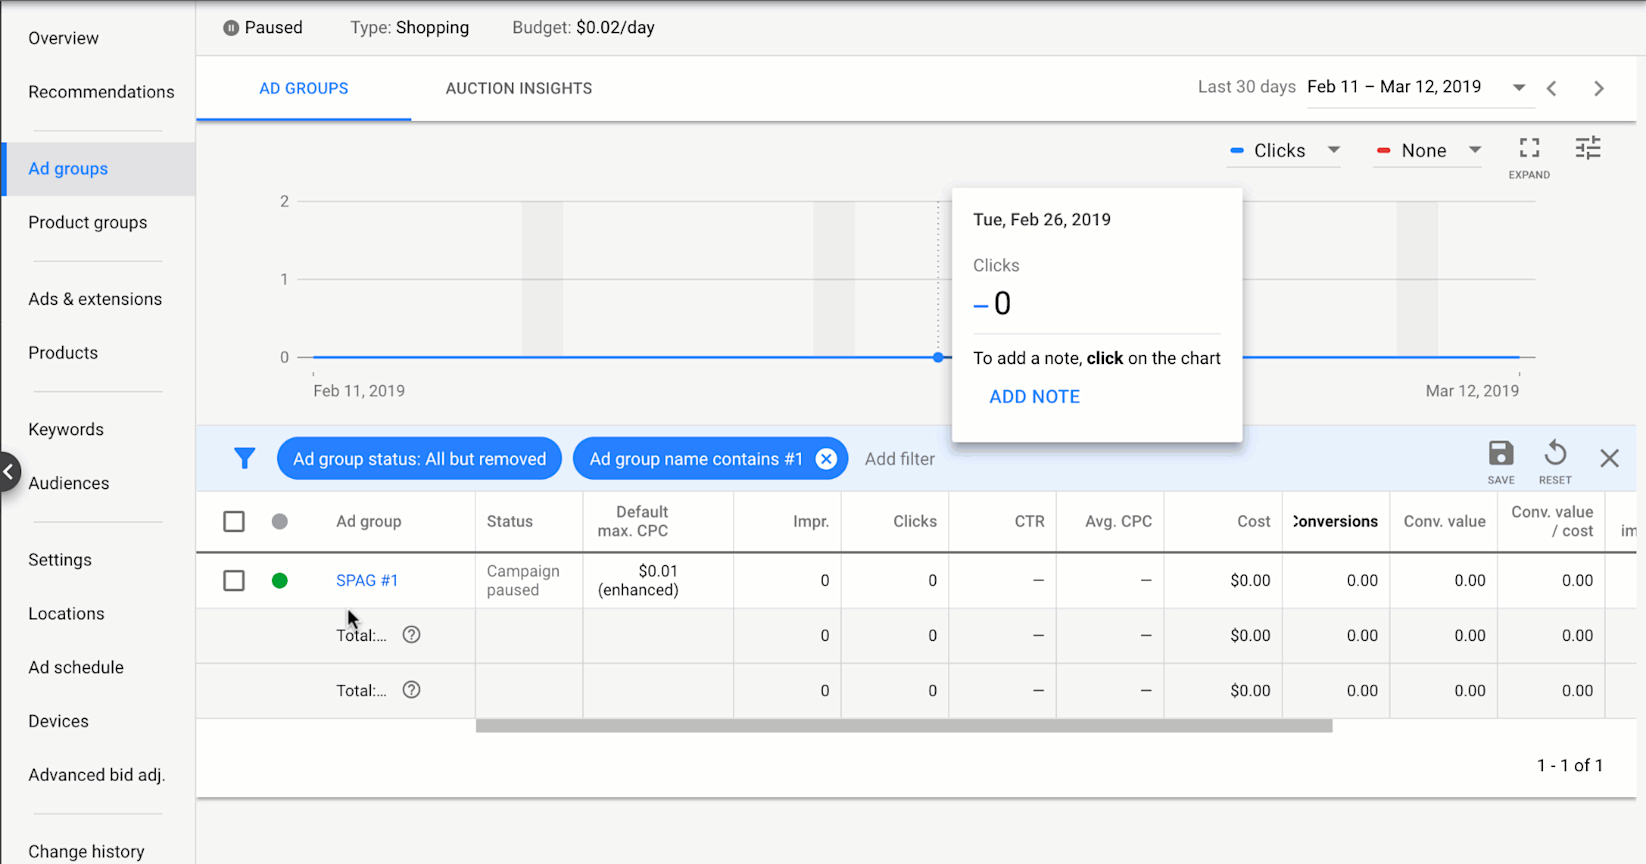
Single-product ad groups (SPAGs) help you isolate budget and prioritize your bestselling products in Google Shopping campaigns.
If you have a catalog of 120,000 products like Walmart does, managing 120,000 individual bids and ad groups would be a pain—but, even with a catalog that large, you may still identify your top 10–30 products. Because these sell so well, you’ll want to ensure that they live in their own campaign.
In that scenario, or if your store sells 30 products or fewer, SPAGs can help you manage bids for each individual product for optimal profit and help you see the exact search terms that each individual product is triggering.
To create a SPAG in Google Merchant Center:
- Create an ad group.
- Name it after your product ID or title (whichever helps you stay organized).
- Subdivide your product group by Item ID.
- Select the ID you named your product group after.
- Exclude “everything else.”
![Screenshot of Google Shopping interface displaying a single product ad group.]() Single product ad group in Google Shopping.
Single product ad group in Google Shopping.
If your store sells a large catalog of products that would make it too inconvenient to use SPAGs for your entire inventory, try to get more granular than “All Products.” Analyze performance by setting brand or product categories: this will keep things manageable but still help you to achieve better bidding efficiency.
Advanced Google Shopping tips and features
There’s more to the Google Merchant Center than diagnostic product data and basic business data. Let’s explore more advanced features that can enhance your campaigns—and make your life easier.
Create promotions
Shoppers can see when a product has been discounted in their Google Shopping tab. Considering that 38% of people shop online to find coupons and discounts, you can use the Merchant Promotions tab to your advantage and run promotions for products in your Google product feed.
To establish these, opt-in to Google’s Merchant Promotions program. Sign into the Google Merchant Center dashboard as an admin and go to Merchant Center programs under the three-dot menu. You’ll see a screen with different Merchant Center programs. Scroll to the bottom and enable Merchant Promotions. This will take you to a short application where you’ll fill in some basic details. Google approves most online stores within a few days.
![Screenshot of Google Merchant Center showing a promotion setup that asks for your country, language, and currency.]() Create new promotion in Google Merchant Center.
Create new promotion in Google Merchant Center.
Now, create a new promotion by clicking the “+” and selecting your country of sale. Define what kind of promo you’ll be running. Google gives you the option to select between:
- Amount or percent off
- Free gift
- Free shipping
You can also set sub-rules for your promotion, like minimum quantities or purchase amounts.
Lastly, give your promo a title (shown in the “Special Offer” link for your ads) and ID—a unique value so that Google understands how this promo differs from others. Tell Google which products are part of the promo, specify a discount code if applicable, and schedule the dates for your promotion.
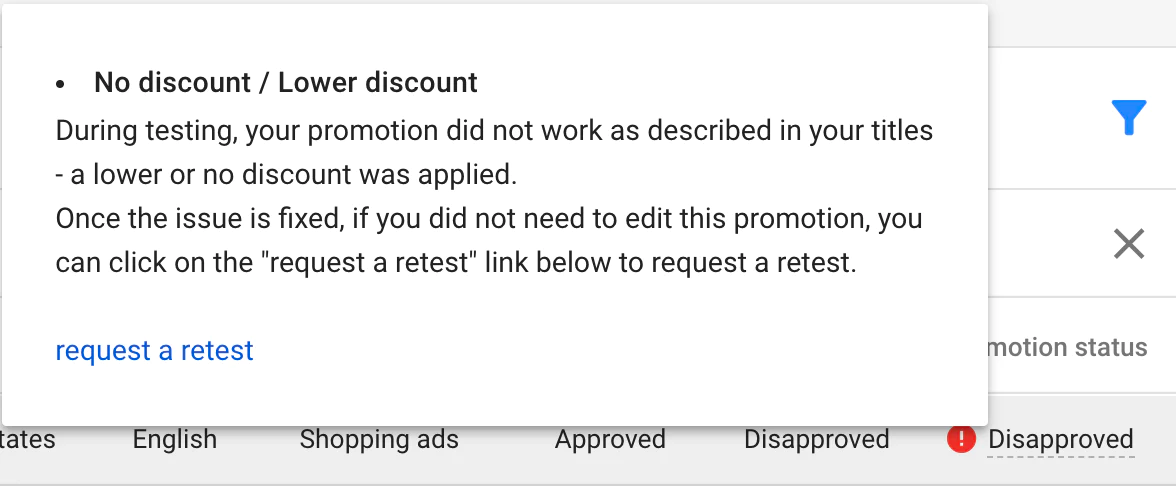
When you submit a promotion through the Merchant Center, there are two layers of approval that it has to go through.
The first is a basic policy approval, which is submitted to Google when you submit your promotion. As long as the title in your promo is clear, accurately describes conditions for the promotion, meets basic editorial standards, and isn’t misleading in any way, you should be good here.
The second one is promotion status (or validation review), which isn’t submitted to Google until the promotion is active on your site. For this step, Google testers will confirm whether the promotion works on your site as described. If your promotion is item-specific, Google will also make sure your promotion’s IDs are mapped to products appropriately.
![A promotion that was disapproved because the discount did not work.]() A disapproved promotion.
A disapproved promotion.
To avoid issues, test for validation review before your sale actually starts by creating a promotions feed. Your promo’s start date is actually split into two distinctions:
- Promotion effective dates: when your promo technically starts
- Promotion display dates: when your promo is actually shown in ads
To trigger an early review, set your promo effective date to a few days beforehand and activate the promo (without advertising it) so that Google’s testers can verify it. Set your promotion display date to begin when your sale actually starts. This will give you a head start on the review process, and you can head into your sale with the confidence of knowing your Shopping promos are approved.
Create Merchant Center feed rules
Feed rules are an easy way for you to create new attributes or improve data in your product feed. Rather than manually adding data to your feed, feed rules allow you to add new information based on data that’s already there.
To find your feed’s rules:
- Sign into Google Merchant Center.
- Find Feeds and select your feed.
- Go to the section marked Rules.
- Click Create Rule.
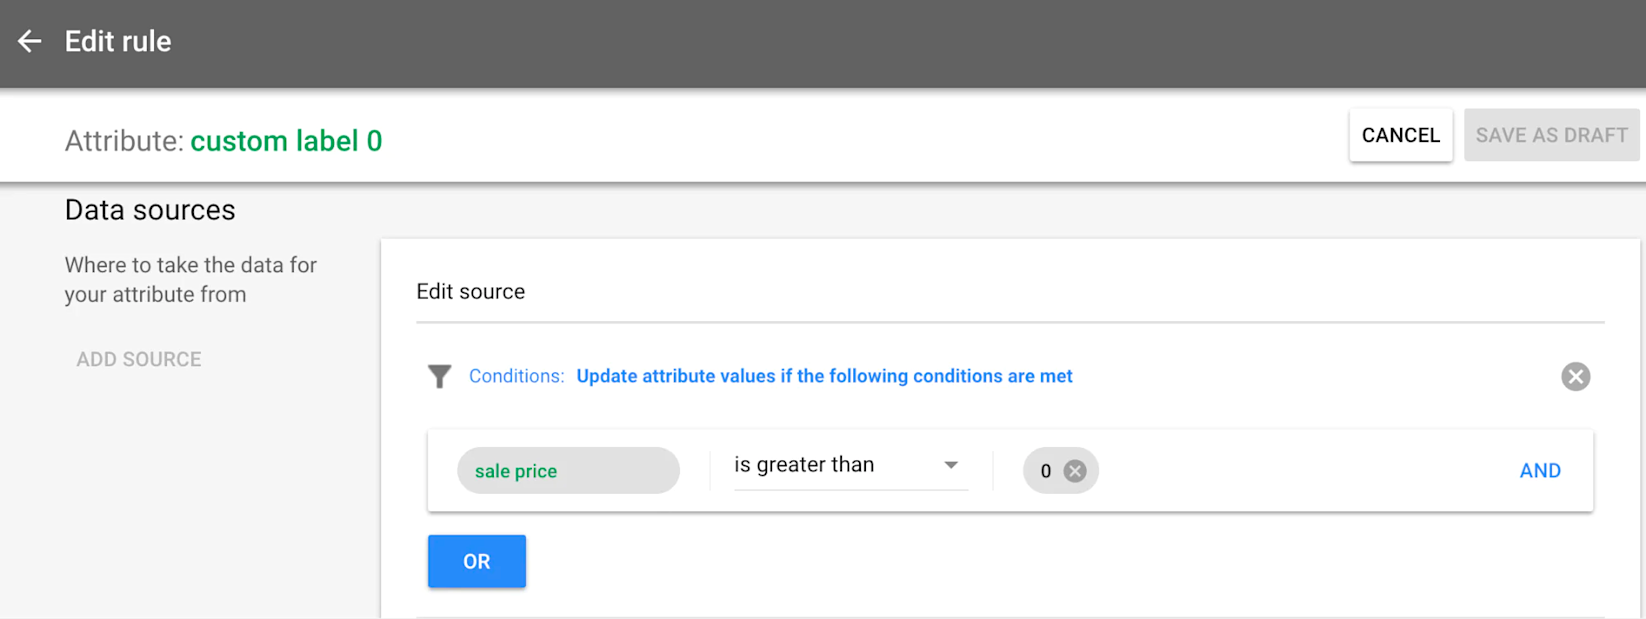
![Screenshot of Google Shopping showing a feed rule.]() Create a new rule.
Create a new rule.
For example, you can create a feed rule to assign a custom label value called “sale” for any marked-down products. From the process attributes menu, let’s select custom label 0, because that’s where you want to assign your “sale” value.
Next, to ensure that only sale products are selected, set the value to include only products with “sale price” greater than 0. Because you want marked-down products to have a custom label 0 set to “sale,” use the rule “Set to” and type in “sale.”
Google Merchant Center then gives you the option to run a test of your rule—this allows you to double-check that it works for both your products and your strategy.
Turn on Performance Max campaigns
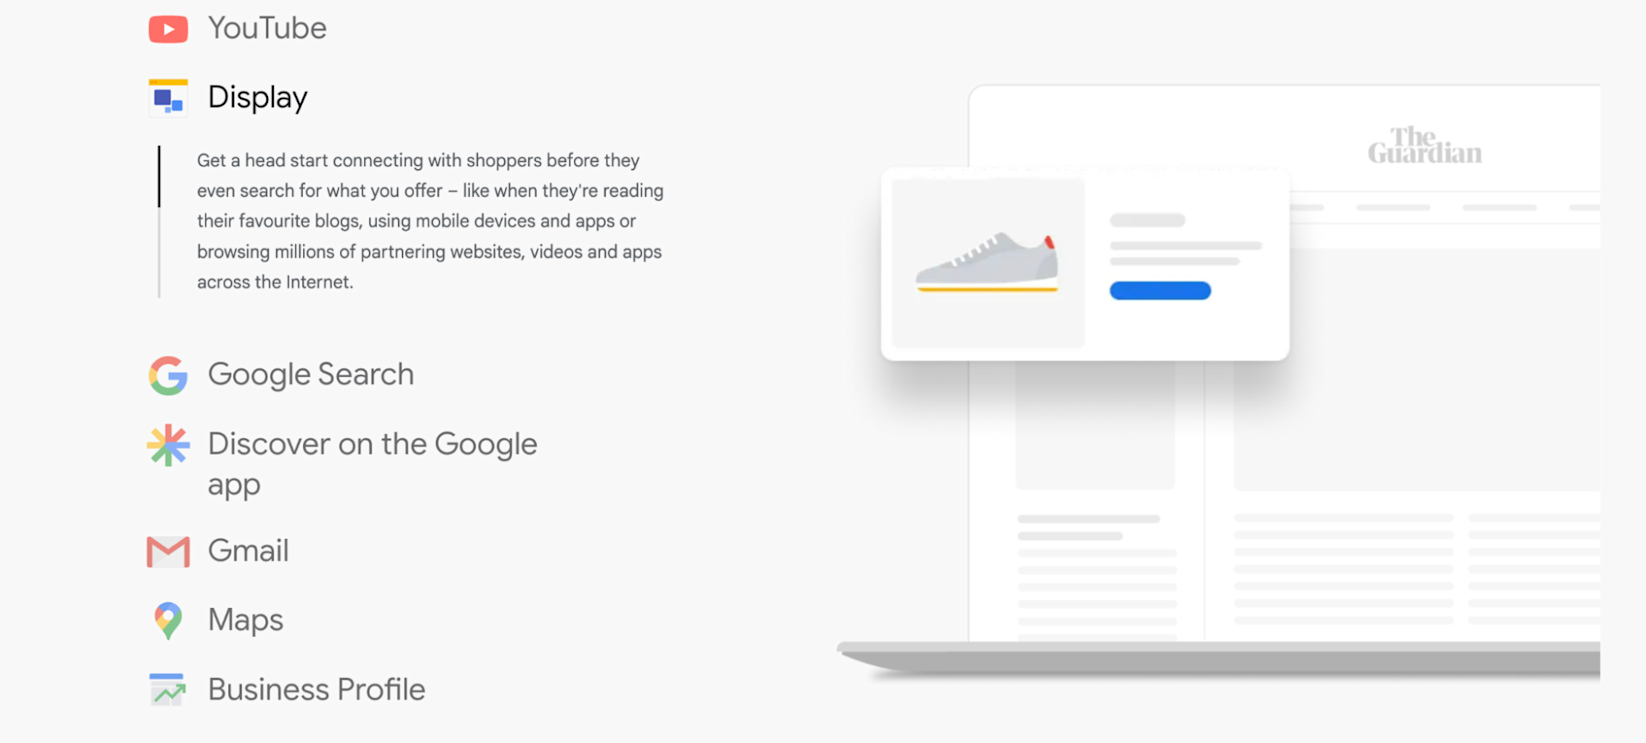
Unlike traditional campaigns, Performance Max ads can be shown across all of Google’s major networks, including Display, YouTube, and Gmail. The advertising algorithm uses machine learning for automatic bidding and ad placement; it relies on conversion rate data to make educated guesses about what to bid and where.
“With the shift from Smart Shopping to Performance Max, advertisers have the option of adding compelling copy and supporting creative to the mix—but for Shopping ads, this is just an illusion,” says Karl Sandor, co-founder and CEO of The Growth Guys. “In reality, these extra assets go into building ads on other Google channels, such as search and YouTube.”
![Performance Max campaigns appear on YouTube, Display, Google search, the Google app, Gmail, Maps, and Google My Business.]() Use Performance Max to advertise on all Google properties.
Use Performance Max to advertise on all Google properties.
Athleisure brand Public Rec used Performance Max to increase online conversions by 28% and achieve a 5:1 return on ad spend. Its SEM manager, Esther Yang, says, “We’ve been able to grow our business by tapping into all of Google’s properties, ensuring that we’re capturing the right customers from every angle.”
Enable remarketing lists for search ads
Remarketing lists for search ads (RLSAs) helps you target people who’ve visited your website in some capacity—allowing you to reach people who are actively searching and are already familiar with your brand and products, and therefore more likely to buy them.
Google Ads gives you two options for using RLSAs:
- Observation (formerly called bid only): This gives you the option to observe how previous visitors behave without restricting your campaign’s reach.
- Targeting (formerly called target and bid): This gives you the option to target people who are on your list exclusively.
In general, Observation creates more traffic volume to offer since it includes new visitors, but Targeting can offer you more efficiency, since it only targets audience members.
To put this in context, here’s a sample of over 250,000 clicks in one Google Shopping account that looks at the differences in return on ad spend and revenue per click between:
- New visitors
- People part of a list in campaigns using audiences with Observation
- People in a standalone RLSA campaign that’s using Targeting only
To set up a standalone RLSA Shopping campaign, copy your higher priority campaign. (Your lower-priority Shopping campaign is already absorbing your high-performing search queries, so you might as well keep it running.)
Similarly, exclude your brand name and less generic top-performing terms from your standalone RLSA campaign. Coupling search RLSA and targeting audiences with broad match keywords gives you the chance to score new search terms you might not have considered while maintaining a controlled environment.
Think of your standalone Shopping RLSA the same way: utilize it as an opportunity to grab more non-brand impression shares that may not convert as efficiently without the power of audiences. As a bonus, you can capture any new search terms that convert and try targeting them in your Search campaigns to grow your account even further.
Run local inventory ads
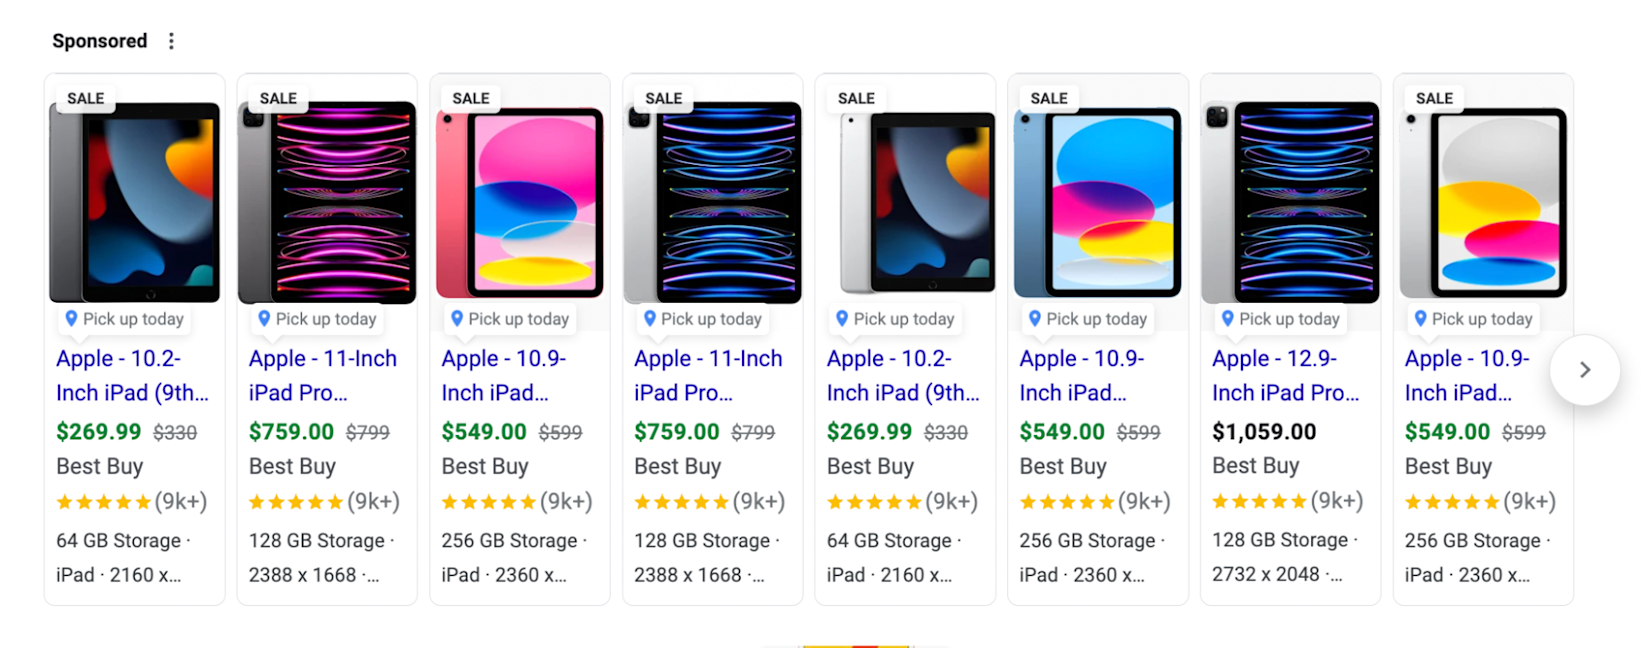
Local inventory ads help you reach local shoppers by showing in the Shopping results for people near a retail location. With them, you can show stock levels for individual stores; showcase buy online, pickup in-store (BOPIS) or curbside delivery options; and track advertising campaigns’ impact on store performance.
Use the Google & YouTube app to configure local inventory ads from Shopify POS. Connect your Google Merchant Center account to Shopify, create a Google My Business listing, and confirm that your local inventory is accurate. You’ll then sync your inventory data and appear in the Shopping tab for Google searchers who are looking to buy products nearby.
![Google Shopping results for “iPad BestBuy” showing a range of iPads that are available to pick up today.]()

















 Google Shopping tab appears before organic listings for this search term.
 Google Merchant Center shows product inventory.
 Sometimes, retailers sync their product data to Google Merchant Center from their website and take no further steps in optimizing their product titles.
 Should your brand name be in product titles? Use this table.
 Best Buy doesn’t include its brand name in Google Shopping titles.
 The mob effect in theory.
 Google Analytics results for this case study.
 Separate negative keywords from your high priority campaign.
 Create one Shopping campaign (or use an existing one) and duplicate it.
 The Gold Pan technique gave a 295% higher ROAS.
 Single product ad group in Google Shopping.
 Create new promotion in Google Merchant Center.
 A disapproved promotion.
 Create a new rule.
 Use Performance Max to advertise on all Google properties.